Introduction
Many embedded systems already have an MQTT broker in place such as AWS IoT Core or Azure IoT Hub. It works, it's stable, and it’s deeply integrated into production systems.
But integrating additional technology platforms usually means introducing new infrastructure or modifying devices. In this write-up, we will explore the process of bridging an existing IoT MQTT broker to integrate with the uLogger MQTT broker.
Our example will use Mosquitto in bridge mode running on Docker, but the principles apply to any MQTT broker that supports bridging.
Key idea: Use MQTT bridging + a topic prefix (ulogger/#) to forward only observability data into uLogger—without disrupting your existing system.
The Architecture
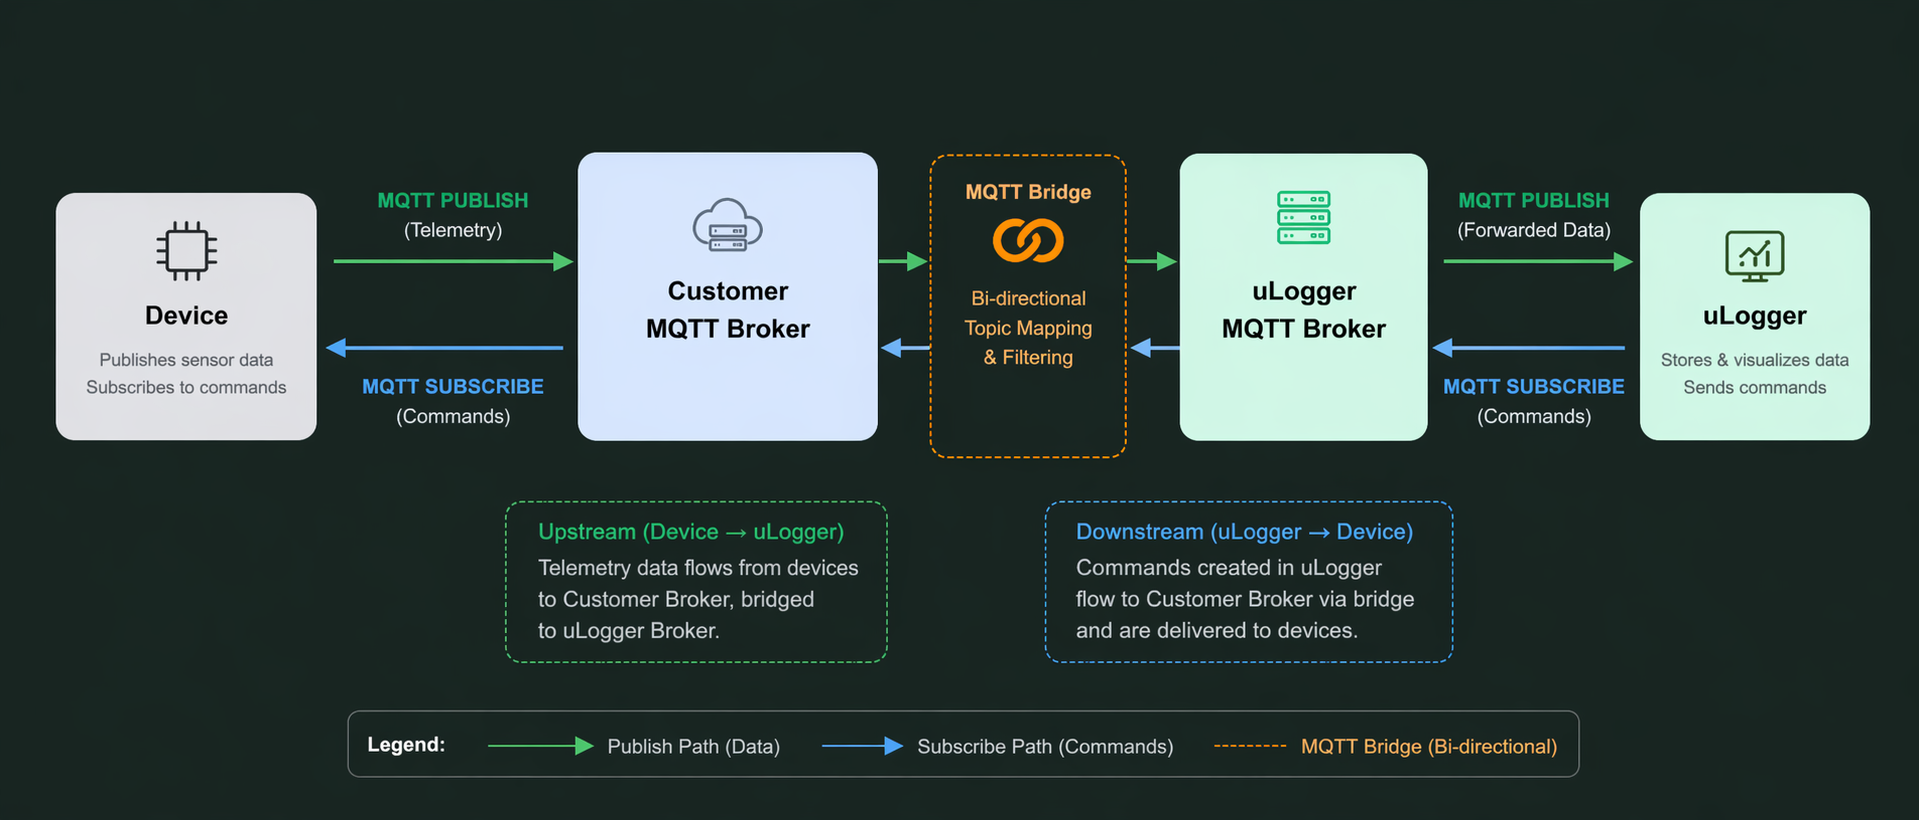
Instead of replacing your broker, you simply extend it.
- Devices continue publishing as usual
- Only topics under
ulogger/#are forwarded - uLogger receives observability data in real-time
The Core Mechanism: Prefix-Based Forwarding
The entire integration hinges on one simple rule:
topic ulogger/# out 1This tells your broker:
- Match all topics starting with
ulogger/ - Forward them to uLogger Cloud
- Leave everything else untouched
Example: Mosquitto Bridge Configuration
1. Define the Bridge
connection bridge-to-ulogger
address mqtt.ulogger.ai:8883
remote_clientid customer-bridge-001
2. Configure TLS
bridge_cafile /etc/mosquitto/certs/ca.pem
bridge_certfile /etc/mosquitto/certs/client.crt
bridge_keyfile /etc/mosquitto/certs/client.key
bridge_tls_version tlsv1.2
3. Forward Only uLogger Topics
topic ulogger/# out 1That's it. This single line is what enables selective observability forwarding.
Running Mosquitto Bridge in Docker
In practice, you'll likely run your MQTT broker in a container. Here's how to set up the bridge using eclipse-mosquitto:2 with a configuration file.
1. Create a Bridge Configuration File
Save this as mosquitto-bridge.conf:
# Local listener for devices
listener 1883
allow_anonymous true

# Bridge to uLogger
connection bridge-to-ulogger
address mqtt.ulogger.ai 8883
remote_clientid customer-bridge-001
remote_username your-ulogger-username
remote_password your-ulogger-api-key

# TLS Configuration
bridge_cafile /mosquitto/config/ca.pem
bridge_certfile /mosquitto/config/client.crt
bridge_keyfile /mosquitto/config/client.key
bridge_tls_version tlsv1.2

# Forward only observability topics
topic ulogger/# out 1
2. Create a Dockerfile
FROM eclipse-mosquitto:2

COPY mosquitto-bridge.conf /mosquitto/config/mosquitto.conf
COPY ca.pem /mosquitto/config/ca.pem
COPY client.crt /mosquitto/config/client.crt
COPY client.key /mosquitto/config/client.key

RUN chmod 600 /mosquitto/config/client.key

EXPOSE 1883 8883

CMD ["mosquitto", "-c", "/mosquitto/config/mosquitto.conf"]
3. Build and Run
docker build -t mqtt-bridge:latest .docker run -d -p 1883:1883 mqtt-bridge:latest
4. Test the Bridge (Optional)
Publish a test message to a device topic:
mosquitto_pub -h localhost -t device/42/temperature \
  -m '{"value": 25.5, "unit": "C"}'
Now publish to the uLogger topic:
mosquitto_pub -h localhost -t ulogger/device/42/log \
  -m '{"level": "info", "msg": "Device initialized"}'
Only the message on ulogger/device/42/log will be forwarded to uLogger. The temperature message stays local.
5. Docker Compose Alternative (Recommended)
For a more portable setup, use docker-compose.yml:
version: '3.8'

services:
  mqtt-bridge:
    build:
      context: .
      dockerfile: Dockerfile
    container_name: mqtt-bridge
    ports:
      - "1883:1883"
    volumes:
      - ./mosquitto-bridge.conf:/mosquitto/config/mosquitto.conf
      - ./certs:/mosquitto/config
        restart: unless-stopped
Then run:
docker-compose up -dWith this setup, your bridge is production-ready: isolated, versioned, and easy to deploy across environments.
What Changes on the Device?
In most cases: almost nothing.
// Existing telemetry
publish("device/42/temperature", payload);

// New: send logs to uLogger
publish("ulogger/device/42/log", log_payload);
You’re simply introducing a new namespace.
Why This Approach Works
Minimal Risk
No migration. No downtime. No disruption.
Incremental Adoption
Start with a single device or topic.
Clean Separation
- Application data → existing broker
- Observability → uLogger
Operational Simplicity
No duplication of entire topic trees—only what you explicitly forward.
Why IT Teams Prefer This: One Firewall Rule
Often observability integrations trigger a network review because they need new broker paths, extra destinations, and a growing list of exceptions.
With MQTT bridging, your network team can approve a single outbound broker rule for the bridge connection, while your engineering team routes observability traffic through ulogger/#.
- One broker destination to review and approve
- Fewer firewall exceptions to track across environments
- Lower misconfiguration risk during change windows
- Cleaner audit evidence for security and compliance teams
You are not asking IT for a new rule every time a team adds a device or topic. You define the bridge once and scale within that approved path.
Common Pitfalls
Avoid Message Loops
topic ulogger/# out 1Don’t use both unless you explicitly need bidirectional flow.
Be Consistent with Prefixes
Stick to a reserved namespace like ulogger/.
Where uLogger Fits
With this pattern, uLogger becomes a drop-in observability layer:
- No architecture rewrite
- No broker replacement
- No device migration
You're not replacing your system—you're augmenting it.
Final Thoughts
MQTT bridging is often seen as a complexity tool, but in this case, it becomes a simplicity tool.
By introducing a single prefix:
ulogger/#You unlock:
- Real-time observability
- Safer deployments
- Faster debugging
TL;DR
Don’t replace your MQTT broker.
Extend it with a prefix + bridge—and plug directly into uLogger Cloud.